Friday, November 19, 2010

Croquem-what?

Wow, what a day! Not only did a Top Chef contestant give me a tour of his bakery, but in class, we got to make a croquembouche!
My day started off in the afternoon, when a group of my classmates went to the Baked Bakery in Brooklyn, where we were given a tour by Eric, from Top Chef: Just Desserts. It was really fun and interesting. He talked to us a little bit about what it is like to run a bakery, gave us a tour of the shop and the kitchens, and we even got a tasting of some of their products! My favorite, I think, was either the pumpkin whoopee pie with cream cheese filling or the chocolate peanut butter rice krispie square, but really, everything we tried was delicious.
After that, we went to class where we began our final day of pâte à choux by making our croquembouches. A croquembouche is a huge cone of cream puffs and other decorations, held together by caramel, and traditionally served at French weddings. I guess they don’t do wedding cakes; they do croquembouches, and while many of them do have a bit of a rustic look about them, some of them can be gorgeous, ornate masterpieces. Go ahead, Google it.
We spent most of our class on this project, making the choux paste, piping the choux balls, piping decorations, and making caramel to hold it all together. I think mine came out pretty well. It’s leaning a bit, yes, but I do like the look of it. I dipped mine in pistachio and coconut, and I tried to alternate them with plain ones, but it got very difficult to keep the pattern going throughout! No wonder these things can cost thousands of dollars…they’re surprisingly complicated! Anyway, I tried to give mine a Thanksgiving theme, and my pumpkin turned out pretty well. Sadly, my hand turkey didn’t fare so well and shattered when I picked it up. Sadness.
Anyway, here’s my croquembouche!

Well, that concludes unit two of my pastry course. I have to say I’m pretty happy to be over with it; I’m not really a huge fan of the stuff. On the other hand, however, it's kind of amazing to me to see how far I've already come in just one month; I can already see progress, and I'm still kind of amazed at the skills I've learned.

Wednesday, November 17, 2010

Hell Yeah, I Want Some Cheesy Poofs!

Last night, we made two items. The first were gougères, which I have been very excited to make for a while now. I have had gougères a few times before, and they’re awesome. I mean, they’re cheese puffs…it’s a no brainer! They’re also incredibly simple to make, of which I have made mental note. All you do is make your choux paste (easy enough since we’ve spent the last few classes learning this dough), add gruyere cheese and some seasonings, and pipe out little blobs onto your sheet pan. Done! Sadly for you, I didn’t get any pictures of these savory delicacies, but since they taste better than they look, it’s no loss. It’s kind of like the opposite of Nuts 4 Nuts…those things smell amazing, but then you eat them, and they suck.  Plus, you totally know the vendor hasn’t washed his hands all day…just sayin’.
But I digress. The second item we made last night was a Gâteau St. Honoré, named for the patron saint of bakers and pastry chefs. Man, they’ve got a saint for everyone, don’t they? As far as this class goes, this cake acts as a precursor to Thursday night, where we make the Croquembouche, a tower of choux balls traditionally served at French weddings. This cake, however, is no slouch and is actually quite complicated to assemble. We had to roll out our pâte brisée, which formed the base. Then, we piped several concentric circles of choux paste. Additionally, we made several choux balls that would ring the cake. After popping those in the oven, we next had to make the cream that would fill the cake, a chiboust. A chiboust is pastry cream with added gelatin and an Italian meringue folded in to lighten. This was our first dabble in Italian meringue, and man was it complicated. It involves cooking sugar to “soft ball” stage, 238 degrees, and then adding it slowly to whipping egg whites. You have to be very careful, since 238 degrees is just a bit hot. Our chiboust thankfully turned out perfectly, thanks to some help from our chefs, and we put our cream in the fridge until we could have time to pipe everything.


BIG mistake!
When it came time to fill the choux balls and pipe our design in the middle, the cream had liquefied into a gooey mess, and we could barely fill the choux, since the cream was squirting out the sides of the bag. We made due, however, and after making caramel to use as glue to stick the choux to the cake, we spread the cream in the center (instead of piping), and it was fine. It’s not as pretty, but it will still taste wonderful.

Well, that’s it for today. Next class is croquembouche, as I said. That one’s a show-stopper!!

Sunday, November 14, 2010

Pipe Dreams

Ok, so I was totally going to name this post “laying pipe,” but I know how my mom feels about vulgarity, so I’ll throw her a bone, this one time.  What it comes down to is that the pâte à choux unit is designed to give us real practice in the art of using a pastry bag to pipe things…which is really important if you want to be a successful pastry chef or baker.
On to yesterday’s class, though. Yesterday’s class was such a relief after the messiness of Thursday, and I think most people left the kitchen yesterday feeling positive about where we stand. We started class by preparing our pâte à choux, which we used to make three different desserts today, including a Paris-Brest ring and our first crack at plated desserts—swans and profiteroles.
After making our dough, we had to pipe out the different shapes for the three different pastries. First, we piped the dough into a teardrop shape which would ultimately become our swans. Going into this class, I was concerned that this would be very difficult, since the idea of piping anything to that would look like a swan seemed daunting to me. However, even though they’re not perfect, these were not as hard as I had envisioned, and my swans came out looking pretty good. They were filled with a crème Martinique, a whipped cream with rum-soaked pineapple folded into it. After assembling our swans, we plated them on a “lake” of chocolate sauce with sauce anglaise hearts.


I know! They’re like, totes fancy and stuff!
Next we plated our profiteroles, a perennial favorite. Leave it to the French to make ice cream sundaes seem snooty and dainty. These were filled with homemade vanilla ice cream and set on a plate of warm chocolate sauce with sauce anglaise. I have to say that I was not too happy with my plating here. My spiral was a bit off, but it tasted good, nonetheless.

Next, we piped rings to form our Paris-Brest, a very traditional French pastry. It is shaped to resemble a bicycle tire, as it commemorates the famous bicycle race between the cities of Paris and Brest. To be honest, I had never heard of this one, but man, is it delicious. To fill it (after all, choux dough is primarily used as a vessel for sweet cream fillings), we got to make our first buttercream, a mousseline called crème Paris-Brest. A mousseline is just a combination of butter and pastry cream and is also referred to as German buttercream. Classically, for a Paris-Brest, you make a hazelnut praline mousseline. We then piped it in a spiral shape. Doesn’t it kind of resemble tire treads?


Well, that’s about it. This class went much more smoothly than Thursday, which was nice. Also, Chef Ron Ben-Israel, a world-famous cake designer who also teaches our wedding cake section, stopped in to say hello. We were all a bit star struck, to say the least.

Friday, November 12, 2010

Pâte À Choux, Pas Du Tout!

Well, I should’ve known something was off today when I missed my subway stop and ended up in Brooklyn. But hey, it was the start of our second unit, pâte à choux, and I was really excited! Sadly, my excitement was to be short-lived.

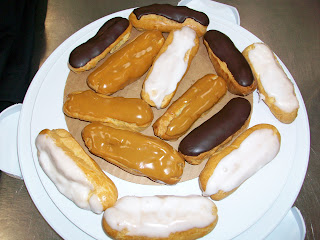
Class started out well enough. We started making the pâte à choux, which is a really interesting dough! It's cooked twice, first on the stove and then in the oven, and its only real function is to hold cream fillings, in such tasty confections as éclairs, profiteroles, and croquembouches. So clearly, it’s a fan favorite. Anyway, we made the dough, which for me, came out pretty well.
My happiness soon dwindled as I began piping the dough into straight lines for éclairs, which I screwed up and had to redo, completely. Fortunately, the second time was the charm, and they came out well. For the record, it seemed that a lot of people had problems with this…I’m sure it’s something that comes with practice, of which we’ll have plenty, since we’ll be doing so much piping over the course of this class.
Next, my new partner Jackie and I got to work on our pastry cream, a new recipe this time that included butter. Well, that went ok, until I realized I had forgotten the butter. Cue sad trombone.
After that, it became apparent that  a) one of the ovens had been set to an improper temperature and b) one of the other ovens just stopped working altogether! Clearly, I was not the only one having an off night. Cue sad trombone again!
So, ultimately, after a long night of mishaps, my éclair shells were totally burned. Fortunately, I was able to use some of Jackie’s, and we filled them with vanilla, coffee, and chocolate pastry creams. Yum!


All in all, the night was just kind of a mess, and that’s ok. The good news is, it’s just pastry, which is one of my favorite things about my new chosen career path! I mean, yes, of course, you want to be the best, the hardest working, and the most creative, but in the end, you’re creating something  that by definition is fun, decadent, and silly. In my opinion, if you take this stuff too seriously, you’re probably doing it wrong.

Wednesday, November 10, 2010

Like Top Chef With Training Wheels

Wow, so I just completed my first test at culinary school, and I have to say, I kinda rocked it! We had a written and a practical section, and it was INTENSE! Everyone says the first test is the hardest, since the first unit is the longest and encompasses so many basics. I found the written test to be fairly straightforward, thankfully, but we'll see how I do when the results come back.

For the practical portion, we had to make one large tart, two tartlets, and five cookies. The kicker was that we didn’t know what types we had to make until we got there, so it was pretty hard to prepare for that section of the test. I was assigned a caramel nut tart, mini quiche lorraines, and shortbread “sablée” cookies. There’s not too much to report except to say that it was a whirlwind of activity from all corners. Everyone was trying to make their components and assemble their tarts, making sure that each component was done in an efficient order to ensure that everything would be done by the end of class! And we got it done, too! Here’s my final presentation:

Chef Cynthia really loved my presentation and raved about my products. To be fair, though, the presentations of my tarts were easier to achieve than others in my class since I didn’t have to do any piping, but it sure is amazing what a little powdered sugar can do. The chef had some critiques, of course, but all in all, my first culinary school test was a success…at least I think so, since I’ll have to wait to receive my grades!

Friday, November 5, 2010

Caramels And Finger Condoms

I reached a major milestone last night…my first culinary school injury. That’s right, I had an incident with a serrated knife, and it was stupid. To add insult to injury, I had to wear a freaking finger condom on my finger all night….fail.
Anyway, fun stuff in last night's class, folks. We started working with caramel, and it was awesome! We sliced apples for our mini tartes tatins, a quick upside-down caramel apple tart. We boiled sugar and water together, until the caramel turned almost black. The goal was to achieve a caramel that had a slight bitterness to it.  Chef Cynthia called my caramel “perfect,” which I only mention because I am my father's son. We poured the caramel into our tartlet molds, arranged the apples, and covered them with discs of pâte sucrée. Once out of the oven, we unmolded them, and here they are!

We then assembled our dough for our pecan bourbon cookies. What what!! Two of my favorite things in one cookie?! Yes, please! We haven’t baked them off yet, but I can’t wait to try them on Saturday.
Next, we got to work on our tarte aux noix et caramel, our caramel nut tart. Mom, this one’s for you! We made our caramel, which we then “slacked off” by adding heavy cream and a little bit of glucose, then adding chopped walnuts. We cooked the mixture further to thicken. Then, we spread it into our tart shells and then covered that with a thin layer of almond cream. I have not tried this one, but it looks AH-mazing. I didn’t get a chance to dust it with powdered sugar, so it's not quite as pretty, but take a look.


Finally, we made the dough for our Linzer tarts. We’ll be making these on Saturday, but we had to give the dough time to rest. Goody, more raspberry.
Well, that’s about it. You can all ask Todd how this stuff is, since I’m unloading it all on him today. What, you think Adam and I eat it all?! Are you crazy?!

Wednesday, November 3, 2010

Chocolate Upon Chocolate

Going into class, I actually had the thought that it was going to be fairly laid back and calm, since our syllabus had us only making two tarts, both of which looked pretty simple and straightforward in the recipes. I was definitely wrong on that.

We started by learned how to make the third in the tart dough triumvirate…pâte sablée (sandy dough), which is a more of a cookie dough, like shortbread.  It’s a very versatile dough, as you can use it for a tart, but you could also use it as a cookie base, which is what we did. We incorporated candied citrus peel and glazed them with a grand marnier glaze. They were delicious, although I found the chewiness of the peel didn’t really go well with the cookie.
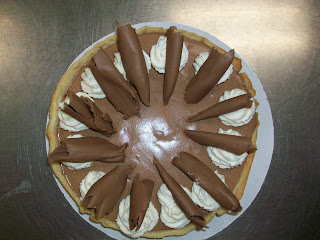
Next, we got to work on our chocolate Bavarian cream tart. We learned that when something is called Bavarian, it means it has a base plus gelatin plus whipped cream. Yeah, I think I can get behind that. In this case, our base was crème anglaise, which is important because it is also our first foray into stirred custards. It is made very similarly to our pots de crèmes, and you have to be very careful not to overcook it and curdle the eggs. After making the crème anglaise and stirring in dark chocolate and gelatin, we strained the mixture into a bowl in an ice bath to chill. After that, we folded in our freshly whipped (by hand, of course) cream to create a light, fluffy bavaroise! After setting up in the fridge and some decorations of whipped cream rosettes and shaved gianduia chocolate, our tarte was complete! And delicious! Take a look!

Next up…ganache! Ganache is simply heavy cream mixed with chocolate. What, you thought it was going to be healthy?! Please. Ganache is very simple, but very flavorful. It really only took a few minutes to make. The difficult part was in the decoration. We learned how to make cornets, which are kind of like the pastry bag’s little brother. It is made out of rolling a piece of parchment paper into a cone and is used for fine detail work. We used melted white chocolate to pipe our designs. It was a little tricky for me at first, but I eventually got the hang of it. So, does this tart look good or what?

And now onto a little bonus section, where I make you jealous. So, one of the courses offered at FCI is called the Art of International Bread Baking. They make the most amazing artisanal breads, and the chefs usually slice up a loaf or two for us to try during class. It’s wonderful! However, at the end of every night, they throw a ton of it out, so we are all allowed to raid the bread kitchen and take loaves of bread home. Man, I can’t even really explain how delicious this bread is. Plain, with butter, as a turkey sandwich…it doesn’t matter. It’s just good. Basically, what I'm saying is, I get amazing bread every other day, and you don't. So there!